 Clothing brands face daily scrutiny for their suppliers’ working conditions, their environmental impact and their delivery times. Who has time to worry about garment quality control too?
Your products ultimately need to speak for themselves. And there’s no better way to represent your brand than with a product that meets your customers’ expectations. But you can’t do that without an effective garment quality control strategy.
Managing garment quality can be especially difficult when importing garments from abroad. How can you create a spec sheet for garments that your supplier will understand? How should you instruct your QC team on how to take garment measurements (related: Garment Inspection Guideline [eBook])?
Controlling garment quality starts with setting the right quality expectations and then inspecting and testing your products before they ship. So let’s look at three specific ways you can effectively manage garment quality—even from a distance.
1. Set clear tolerances for garment measurements
How likely are you to buy or wear a piece of clothing that doesn’t fit? Not very likely, right?
Measuring garment dimensions is a critical aspect of garment quality control. Most consumers care about the fit and comfort of a piece of clothing more than any other factor. But garment measurements can also be one of the hardest aspects of garment quality to manage with your supplier.
Garment manufacturing is a labor-intensive process, which  doesn’t lend itself to cookie-cutter consistency between pieces. Unlike injection-molded products and others that can be made with standardized production methods and equipment, garments are typically individually handsewn.
For this reason, you’re more likely to find discrepancies between pieces of clothing than with other products.
When creating garment specs, set a tolerance for each point of measurement that allows for a small margin of error. And provide this list of tolerances to both your supplier and your QC team to ensure goods are produced and inspected to your requirements.
Specify each point of measurement in a spec sheet for garments
Your garment specs should include:
- Each point of measurement (POM): These will vary depending on the garment you’re manufacturing. For instance, you’ll need to measure the waist for a skirt but the sleeve length for a shirt.
- Your desired standard measurements for each size ordered: These are normally based on a pattern grading But your sizing might vary based on your customers’ preferences and garment type.
- Your tolerance for each point of measurement: This is the range above or below your standard measurement that you will still accept, typically presented as a “+/-” value.
Depending on the complexity of your garment, you might set upwards of 15 points of measurements.
But some dimensions for garments may be less crucial to the overall fit of the garment than others. You might use a higher tolerance for dimensions less critical to the item’s fit. Other times, you might set a lower tolerance if the nature of the item or dimension allows for a lower margin of error.
For example, if you’re manufacturing prom dresses, one such dimension might include “shoulder width from edge to edge”. This might be a less-forgiving dimension with a relatively small discrepancy of 1/8" allowed to ensure a proper fit.
You might use a looser tolerance of 1/4" for another dimension, such as “neck width from edge to edge”, which won’t affect the overall fit as much. A size 12 dress with the desired measurement of 10" for the neck width could, therefore, be 9 7/8" or 10 1/8" and still pass inspection.
 Many professional inspectors will use a tolerance equal to half the grade rule in the absence of tolerances from the buyer. Providing your supplier and QC team with your spec sheet for garments will help ensure they evaluate your shipment to your specific standards.
Tips for how to measure garments
Here are some helpful tips for how to measure garments accurately:
- Lay the garment on a flat surface for easier and more accurate measuring
- Avoid stretching the garment in any way when measuring, as this will skew results
- Always take initial garment measurements before fitting the garment on a model or dummy
- Take any stretched measurements last (e.g. minimum neck stretch)
- Touch the measuring tape to the surface of the fabric when taking garment measurements
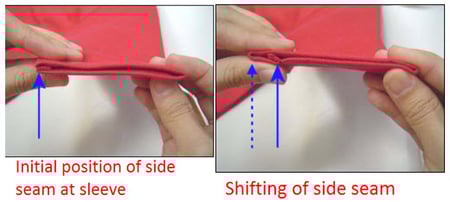
- Lay the garment openings (e.g. sleeve, neck, leg) so the seams are not positioned on the side. Ensure the seams are shifted slightly inwards (see below photo).
 In a typical garment inspection, an inspector will randomly pull and measure one or more pieces per SKU and record all dimensions in a measurement table. This table lets you see each measurement for all sizes and will show whether dimensions are within tolerance.
2. Conduct on-site tests during pre-shipment garment inspection
Garments aren’t considered “functional” products in the same way consumer electronics or sporting equipment are. But that doesn’t mean you should skip on-site testing during garment inspection.
On-site testing during inspection helps ensure you’ll receive a finished product that meets your quality expectations, aside from fit. Your inspector can help verify your garment’s durability and functionality with on-site tests that mimic regular consumer use.
Below are some of the most common on-site tests performed during a garment inspection.
Fitting test
The inspector will put the garment on a model or mannequin to check whether it fits correctly. Inspectors will typically check one piece per size.
The number of sizes the inspector can check will depend on whether the factory has mannequins of multiple sizes available. Be sure to clarify this availability ahead of inspection if its important for you to fit each size before shipment.
Dry and wet crocking test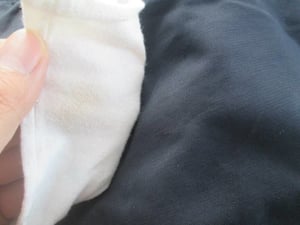
Crocking tests involve rubbing a piece of white fabric on each colored fabric of the garment for 10 repetitions. Then the inspector checks the white piece of fabric for any color transfer.
The dry crock test uses a dry piece of white fabric, while the wet crock uses a wet piece soaked in water. Inspectors will typically test at least two pieces per style for this test.
Seam strength test
The inspector will stretch a garment along its seams and any edges or openings (e.g. armholes, necklines, etc.) using a normal force during this test.
The inspector will check for any cracking of the stitching or binding after the test, as well as verify the security of any trims (sequins, beading, etc.). These trims should stretch with the garment without breaking.
This test is typically conducted on the full sample size inspected, since a quality issue with seams could have a major impact on the product’s salability.
Fatigue test of fastener
The fatigue test of fasteners entails opening and closing any fasteners, such as buttons, zippers or snaps, 50 cycles per fastener. There should be no loss of function after this test.
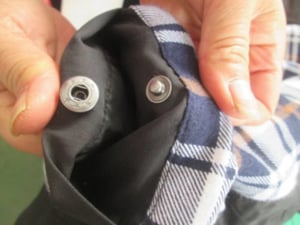
Inspectors will usually test at least two pieces of each style to ensure proper functionality. A supplier will typically use the same fasteners throughout the entire shipment. So inspectors can often find any issue with the fasteners by checking a small sample size.
Stretch test
Inspectors will typically stretch the elastic fabric and straps of any garments that contain elastic to check elasticity. Any elastic straps or fabric should show proper elasticity without exposing elastic fibers or broken stitches during this stretch test.
Inspectors will typically check the full sample size inspected for this test, as elasticity can be vital to the fit and function of certain garments like underwear and sportswear.
Stitches per inch (SPI) check
The number of stitches per inch (SPI), or stitch density, can impact the strength, appearance and performance of a garment seam.  A greater number of stiches per inch often indicates higher-quality stitching.
Set a standard for stitches per inch in your spec sheet for garments before production (related: 4 Sewing Stitches Used in Manufacturing and Their Benefits). Inspectors will use a measuring tape to simply count the number of stitches per inch on at least two pieces per style. The SPI count should conform to your garment specs and your approved sample, if available for reference.
Roughly checking the SPI of bulk garments during the regular visual inspection is also helpful to ensure these are consistent with the pieces measured above.
3.Perform lab testing for apparel quality control
Sometimes you might need to go a step farther to manage apparel quality control. Any problems with overall fabric quality, for instance, may be a sign of an underlying problem with material composition.
 Garment lab testing typically involves pulling a sample of the production material and sending it to an accredited laboratory for assessment. Third-party labs can help you test samples of colorants, decorative stones, sequins or the base fabric of a garment itself.
Many suppliers will claim to have a qualified lab set up for testing fabric or garments at the manufacturing facility. And some of factories actually do have a professional and capable lab. But many others have, at best, a crude lab for product testing.
Many on-site tests for garments are simple to conduct and inspectors might not need any special training or qualifications to conduct them.
But a factory’s own lab is often inadequate for professional-grade lab testing if they lack accreditations from recognized certification bodies like the Hong Kong Accreditation Service and the China National Accreditation Service. Make sure any lab you plan to hire for garment testing holds the appropriate certifications.
Composition testing
Most countries require garment importers to label their products with a fiber identification label (related: How to Comply with Legal Requirements for Clothing Labelling). These regulations help consumers avoid any materials they might be allergic to and help prevent fiber mislabeling.
But how do you know what fibers make up your garments? Many modern fabrics are actually a blend of several different fibers.
Third-party laboratories can conduct a fiber identification or material composition test to verify fabric composition. This test will give you an accurate breakdown of fibers, which you can use to list the appropriate fibers and their percentages on your garment labels.
Safety and environmental testing
Lab testing can also help you assess the safety of your garments. Unlike most products, clothing articles tend to have direct and prolonged contact with bare skin—which can pose a potential hidden danger many garment importers overlook.
Lab tests help protect consumers from unsafe materials and environmental hazards associated with wearing your garments.
A qualified lab can test your products for the presence of:
- Azo, carcinogenic or allergenic dyes
- Extractable heavy metals
- Phthalates and formaldehyde
They can also assess the flammability of your products in accordance with regulations in your target market. U.S. importers of children’s sleepwear, in particular, will need to meet strict flammability requirements before sale.
Performance testing
You might also want to verify your garment’s durability and performance during regular use throughout its intended lifecycle. Some on-site tests like the fatigue test and crocking test can provide insight into garment durability.
But importers wanting a more precise evaluation of garment durability will need the aid of professional-grade laboratory equipment.
Labs can help you test your garments’ physical properties, including:
- Dimensional stability with washing and drying, checking the stretch and shrinkage of the fabric
- Colorfastness, by testing exposure to light, perspiration, water and bleach
- Physical characteristics, such as pilling and abrasion resistance
Above all, ensure your garments adhere to safety and industry standards in your target market. Some lab tests may be more or less important to your apparel quality control strategy depending on your market’s standards.
Conclusion
Want your customers returning to you each season eager for new clothing items? You’re now one step closer with these three steps to managing garment quality.
Garment inspection should, at minimum, include a series of vital on-site tests to verify attributes like seam strength, stitching and fit. Consider how to take garment measurements and whether you need to employ a third-party lab to test your product. Then create a spec sheet for garments that will help your suppliers understand and meet your standards.
Garment quality issues can stem from any number of factors. But following these three steps to manage garment quality can help ensure your finished goods meet your garment specs.
Editor’s note: This post was originally published in January 2016 and has been updated for freshness, accuracy, and comprehensiveness.
Let us know what other criteria you consider essential to garment QC in the comments below.