According to a 2015 holiday report from Deloitte, clothing is one of the most commonly exchanged gifts during the holiday season. But unfortunately for those in the garment industry, it’s also the most frequently returned holiday gift each year, accounting for 62 percent of all such returns.
While poor product quality may not be the most common reason for a customer to return a product, it’s definitely a factor. You can’t force a customer to like your product, but you can prevent returns due to shoddy quality. And garment inspection is one of the best ways to verify the quality of a clothing item before it leaves the factory.
Product inspection for garments can be a complicated process. Many garment importers aren’t sure what criteria to apply for inspection and what on-site product tests to perform to ensure their items meet their customers’ expectations before shipping.
Here are five of the more common on-site product tests for garments to help you inspect your next order at the factory:
1. Crocking test for garment inspection
A dry or wet crocking test helps manufacturers confirm that a garment’s color won’t transfer from one garment to another fabric or bleed during normal use. You can also use this test to check whether the printing, logo or any labels on a garment will remain legible and true to color specifications. Inspectors typically perform this test on a random sample of pieces, often 2-5, taken from a lot size.
The dry crocking test and wet crocking test are actually two separate tests, but they follow very similar procedures. They’re both also typically performed during the same inspection. The only difference is that a dry white cloth is generally used in the dry crocking test and a water-soaked white cloth is used in the wet crocking test.
You can perform the crocking test by following the steps below: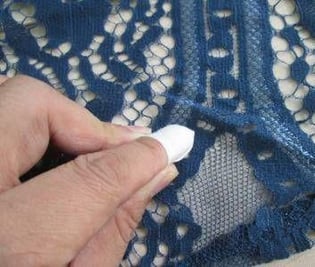
- Prepare a cloth - For the dry crocking test, prepare a dry white cloth—cotton is best. For the wet crocking test, dampen the white cloth with water.
- Survey the garment - Determine the structure of the fabric. Find how many different fabrics the garment has and check if the garment contains any printing, logos or labels that need testing as well.
- Rub the white cloth against the fabric of the garment - To conduct the test on a garment’s printing, logo or label, rub the respective area with medium force 20 times back and forth. If the garment has multiple fabrics, printed components, logos or labels, repeat this step on each different area.
- Look for signs of color transfer - Check the white cloth to see if there’s any color that transferred from the garment. If any color has bled from the garment or material tested to the white cloth, the garment has failed the test. If the appearance of white cloth remains unchanged, then the garment has passed the test.
2. Metal detector check for garments
It may seem strange or unlikely that metal could end up in clothing. But it does happen and represents a critical defect and cause for an importer or customer to reject an entire order of clothing. The metal detector check is necessary to protect customers from needles, staples or any other bits of metal that factory workers might mistakenly introduce to an item during production or packaging.
To perform this test, you’ll need to use a metal detector, which is usually available at most larger factories. Unlike most other on-site tests, you’ll generally check the full order quantity for metal, rather than only checking a sample. Bear in mind that this test should only be performed on a garment that has stuffing and isn’t meant to contain metal. For garments with metal components, such as metal buttons or zippers, this test doesn’t apply.
Follow these steps for doing a metal detector check for garments:
- Check the machine - Make sure the metal detector is properly calibrated.
- Prepare the garments - Move the goods to the production area near the metal detector machine.
- Run each piece through the machine - Put the product through the metal detector, one piece at a time.
- Listen for detected metal - While the clothing passes through the metal detector, listen for the machine to emit a beeping noise. If a garment doesn’t contain any metal, the metal detector won’t make a sound. If there’s metal present, the metal detector will make its distinctive warning sound.
3. Light box garment color check
A light box check helps manufacturers verify that the color of finished goods conforms to specifications. It’s typically an enclosed cube with an electric bulb inside and one side that’s open or covered with a translucent pane of plastic or glass. The device blocks out all other light sources so that an inspector can clearly see any difference in color or shading present in a garment.
Many garment factories have a light box available for conducting a garment color check. A light box is not among the tools third-party QC staff typically bring with them to an inspection. The factory may not have a light box. But you can still verify the color of a sample of garments with fairly reliable accuracy using a Pantone color swatch under adequate lighting.
Here are the steps for the garment color check using a light box:
- Check the light box - Determine that a light box is available and in working condition.
- Place the goods in the light box - Put one clothing piece from mass production and any approved sample—sometimes called a golden sample—of the same item into the light box.
- Look for color difference - Check if the color of the product is the same as that of the approved sample. The garment fails this test if there’s any noticeable difference in color between the mass produced piece and the approved sample. The test result is pass if the color is the same in both pieces.
4. Seam strength test for garments
Seam strength is an important consideration for most garment manufacturers and importers. An item of clothing with poorly sewn seams is likely to fall apart during use. A seam strength test checks the seam stitch and binding quality on a sample of garments. You’ll want to ensure that the seam is secure and there aren’t any open seams or similar issues related to sewing techniques.
The procedure for testing garment seam strength is as follows:
5. Stitches per inch check
Stitch density is an important quality in a garment related to integrity of the product. Typically measured in stitches per inch (SPI), a higher SPI usually makes a garment more durable and longer-lasting. Whereas a garment with a relatively low SPI is more likely to fall apart in a shorter period of time.
Like many garment importers, you may have a tolerance or minimum SPI for your product. Checking garment SPI is one way to test if clothing factories have met this specific product requirement. You or an inspector can perform this test anywhere with a tape measure and adequate lighting provided. Checking a sample of at least two pieces for each style of garment will give you a reasonably confident estimate of SPI in an order.
The stitches per inch check is performed as follows:
- Prepare the garments – Lay out the garments you’re inspecting on a flat service.
- Choose an area on the product to measure - Use a tape measure to measure one inch from one point to another along a line of stitches.
- Count stitches - Count the number of stitches in the one inch segment.
- Check SPI against product specification - Ensure that SPI is consistent and conforms to product specifications by comparing one inch segments in multiple areas of the garment.
Conclusion
Conducting on-site tests as a part of garment inspection helps ensure that your customers won’t return your product because of quality issues you weren’t aware of at the time of shipping. Both importers and suppliers benefit from product tests because the goods that often fail highlight issues related to production, handling and packaging. By finding problems with a product before shipping, suppliers can improve their manufacturing processes and meet shipping deadlines more reliably.
These are just a few on-site tests commonly performed during the inspection process for garments. But some on-site tests are more important than others. By considering product type, acceptable quality level, known quality issues and other factors, you can determine which tests are best for you. And having relevant tests for your orders often means fewer quality problems and more satisfied customers.
What other on-site tests do you consider to be important for product inspection of garments? Let us know in the comments section below!