Many importers don’t bother learning about AQL sampling for product inspection because they think the AQL sampling plan tables are too technical.
An “AQL table” typically refers to the ANSI ASQ Z1.4 table developed by the American National Standards Institute (ANSI) and the American Society for Quality (ASQ). QC professionals commonly use the ANSI ASQ Z1.4 standard for AQL sampling when inspecting consumer products.
The numbers, letters and terminology surrounding this table can seem intimidating at first. So importers often leave the details of understanding acceptable quality levels (AQLs) to QC professionals.
But the truth is most anyone can easily understand and apply the ANSI Z1.4 table. And as an importer, familiarity with the table will help you better monitor and improve the quality of your products before they leave the factory (related: The Importer’s Guide to Managing Product Quality with AQL [eBook]).
There are five main parts of the single-sampling ANSI Z1.4 table: lot sizes, inspection levels, sample size code letters, acceptable quality levels and acceptance and rejection points. Let’s explore these to help you confidently choose an ANSI sampling plan that matches your inspection needs and budget.
1. Lot size
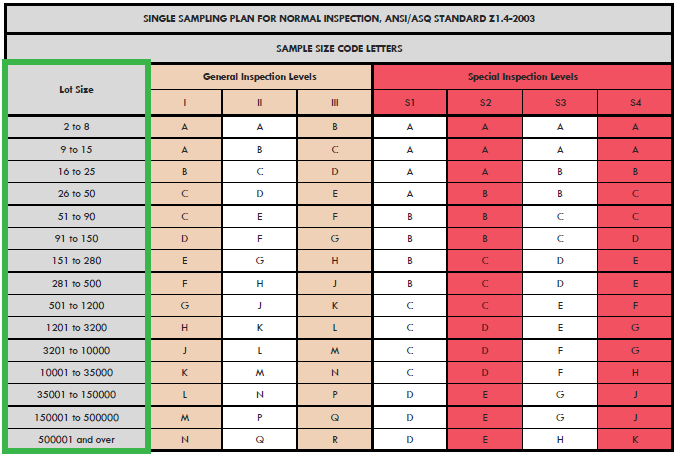
On the far left of the first side of the ANSI Z1.4 table you’ll see a section for “lot size”, referring to your total order quantity. Lot size is your starting point for using the ANSI Z1.4 table, represented by a range of order quantities expressed in units.
This part of using the AQL sampling plan tables is easy— simply choose the lot size range containing your total order quantity. For instance, let’s say you have an order quantity of 300 tablet PCs. You’d use the lot size range of 281 to 500 units.
 2. Inspection level
To the right of the lot sizes, you’ll see the ANSI Z1.4 table is further divided into two categories, “general inspection levels” and “special inspection levels”.
The inspection level you choose is a critical determinant of your ANSI sampling plan and the scope of your product inspection. So carefully consider your product quality standards, customer expectations and time and budget constraints when choosing an inspection level.
General inspection levels
QC professionals use general inspection levels for checks they’ll perform on the main sample size which includes all SKUs in the order. This typically involves visually inspecting the product to look for quality defects and nonconformances, as well as conducting any on-site tests and checks that cover the main sample size.
Some examples of checks you might perform on a main sample of tablet PCs include checking assembly, retail packaging contents and packing assortment. It makes sense to use a “general” inspection sample size because these checks can be done relatively quickly.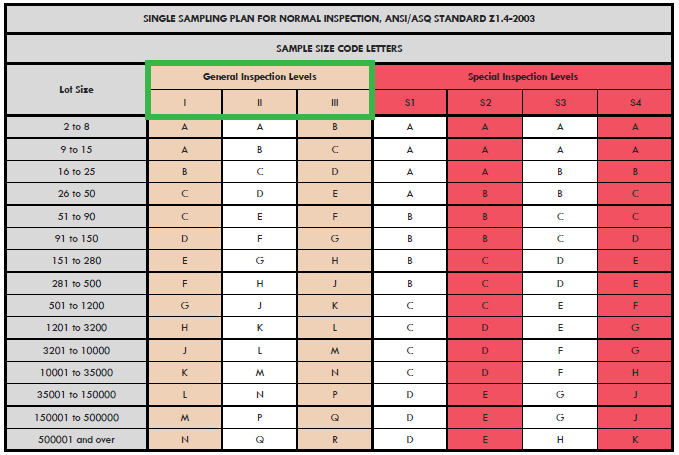
General inspection levels are divided in three smaller columns—“GI”, “GII” and “GIII”—each with its own set of sample size code letters corresponding to specific lot size ranges.
Among these three levels, GI is associated with the smallest sample size. Considered the “budget option, you may prefer GI if you’re pressed for time or money and only need a cursory inspection of an order.
GIII is the tightest standard and requires inspecting a larger sample size, providing a more thorough assessment of an order’s overall quality. The drawback of GIII is that a larger sample size tends to require more time to inspect, which makes it the most expensive option.
GII is the middle option and is the most common ANSI sampling plan for inspecting consumer goods.
Special inspection levels
You’ll typically use special inspection levels for special product tests that should only be conducted on a relatively small sample of units. Smaller sample sizes are usually needed because such tests:
- Are destructive to the product
- Are expensive or tedious to perform; or
- Tend to yield similar results across all units in the order
An example of a product test that can be destructive and applies to most products, including tablet PCs, is the carton drop test. Other tests, like the battery recharging test and port function and insertion/removal test, are time consuming. And it’s not necessary to check printing adhesion on several tablets, since the print application process almost never varies between units of the same SKU.
Special inspection levels are divided in four: “S1”, “S2”, “S3” and “S4”. As with general inspection levels, S1 offers the smallest sample size and S4 offers the largest.
Your decision to use special inspection levels will likely depend on what is applicable to your product type. Just be sure to include your requirement in a detailed QC checklist for your supplier and inspection team.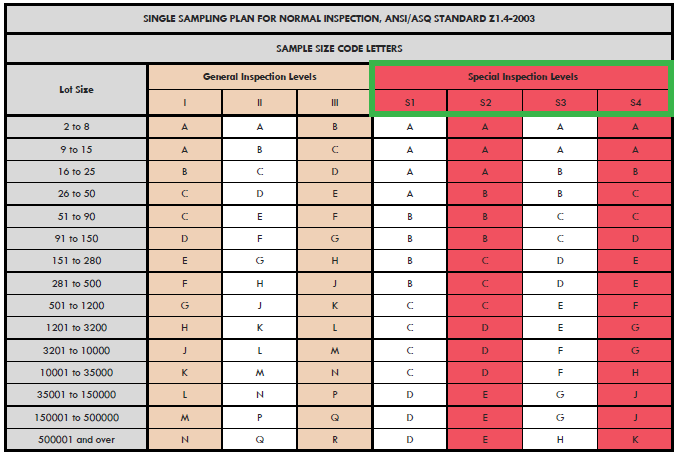
3. Sample size and code letters
After determining your lot size and inspection level, you’re ready to find your sample size. Sample sizes are represented by code letters on the first part of the ANSI Z1.4 table. By following the row of your lot size to your chosen inspection level, you’ll see a corresponding code letter listed.
Let’s say your chosen inspection level for your order of 300 tablet PCs is GII. We can see the corresponding sample size code letter is “H” on the first part of the ANSI Z1.4 table.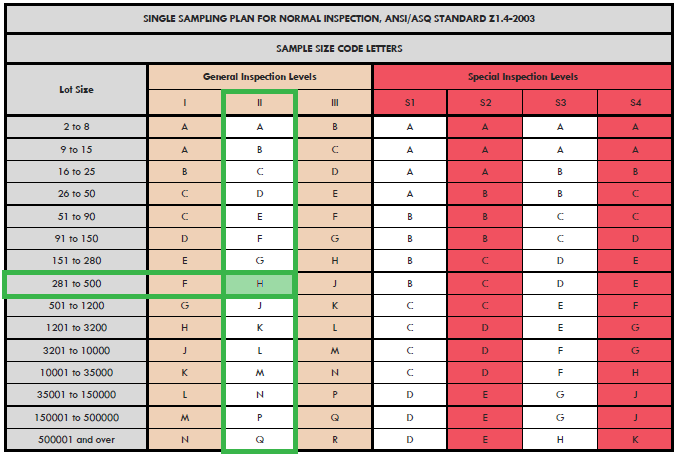
The second part of the AQL sampling tables then lists the sample size, or the number of units to pull for inspection, next to the corresponding code letter. For H, your sample size will be 50 units.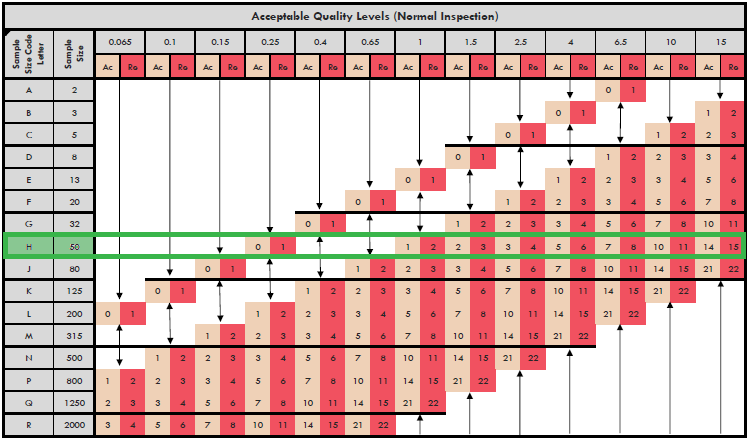
But you’ll notice there are also arrows pointing up or down for certain sample sizes under each of the acceptable quality levels. These arrows indicate where you should use a different sample size based on your tolerance for defects, or your AQL, rather than your lot size.
The sample size determined by your lot size can sometimes be too large or too small for your chosen AQL. You may require a larger sample size if you choose a relatively low AQL, for instance. The lower your tolerance for defects, the more units you’ll need to inspect to reasonably predict the average quality of the total order. And if the appropriate sample size equals or exceeds your lot size, you’ll inspect 100 percent of the order.
But a large sample size is often redundant for large lot sizes if you have a higher tolerance for quality defects. You can get the same confidence in results from inspecting a smaller sample size, which will be less time consuming and less expensive.
In these cases, follow the arrows to the appropriate sample size and use this one for your inspection.
Returning to the above example, imagine you’ve set a relatively low AQL of 0.65 for major defects. You’ll need to use a sample size of 80 units (coded as J), instead of the 50-unit sample size corresponding to H, as shown by the downward arrow.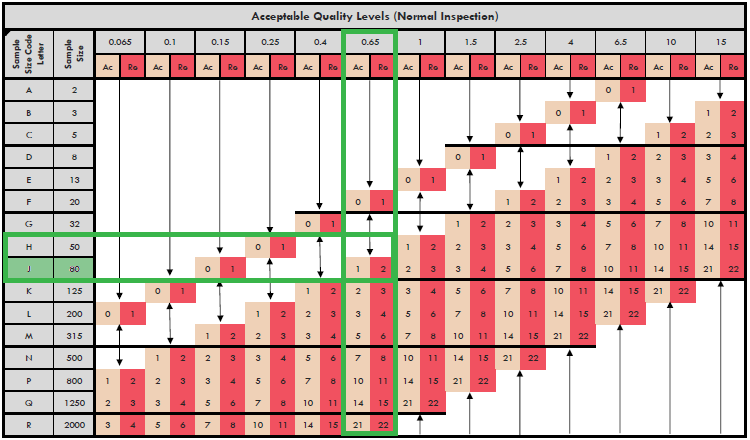
4. Acceptable quality levels (AQL)
Sometimes called “acceptable quality limits”, AQLs range from 0 to 15 percent or more, with 0 representing the lowest tolerance for defects. Importers’ tolerance for “minor” defects tends to be higher than that for “major” and “critical” defects. So they usually choose a different AQL for each of these classes of product defects.
For consumer goods, QC professionals typically recommend AQLs of 0, 2.5 and 4 percent for critical, major and minor defects, respectively (related: 3 Types of Quality Defects in Different Products).
The ANSI sampling table will show you different sample sizes for each of the AQLs you set for different classes of defects. But you can typically use the largest sample size for all classes of defects. Since you’ll be pulling these units for inspection anyways, you can inspect all samples for all defects to better assess the total order quality.
Choosing an AQL isn’t always as simple as adopting whatever QC professionals or other importers recommend. What works for one importer might not work for you, depending on your customers’ expectations. There are several factors to consider when choosing the best AQL for your circumstances, including:
- What quality level your supplier considers reasonable and has agreed to meet
- Your inspection budget (lower AQLs typically require larger sample sizes and more time)
- Your exit-factory date
- The value of the goods in question (more expensive products tend to warrant lower AQLs)
Although you might select what you perceive as a reasonable ANSI sampling plan, your supplier might not feel the same way. Agreeing upon quality standards early is crucial for QC inspection. The factory or vendor may try to dispute the results of an inspection without such prior agreement on an appropriate AQL (related: How AQL Sampling Affects Your Product Inspection Results).
5. Acceptance points and rejection points
Your chosen AQL for each type of defect will determine a corresponding acceptance point and rejection point.
The acceptance point indicates the maximum number of defects you’ll accept in the order, while the rejection point indicates the minimum number of defects needed to reject the order. For example, an AQL of 0 for critical defects has a rejection point of 1 defect. This means that if inspectors find even one critical defect, the inspection result will be “fail”.
Acceptance and rejection points increase as your tolerance for a defect increases, relative to sample size.
If you choose an AQL of 1 with a sample size of 50 units, your acceptance point is 1 defect and your rejection point is 2 defects. But you might decide your tolerance for this defect is actually much higher and an AQL of 4 is more appropriate. The corresponding acceptance and rejection points would then also be much higher, at 5 and 6 defects, respectively.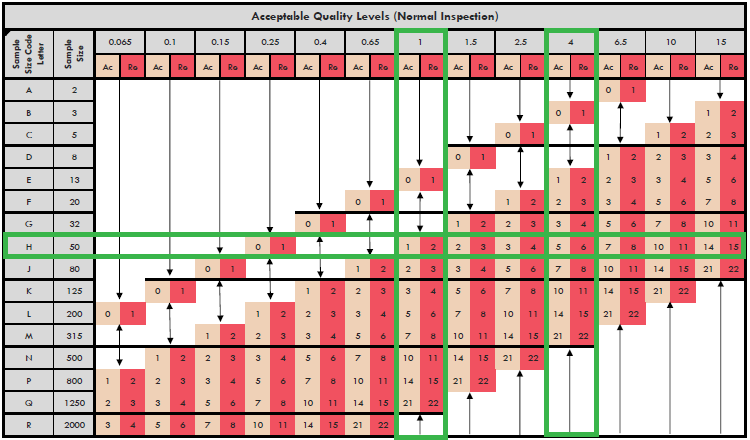
Conclusion
Behind all the numbers and letters on the ANSI ASQ Z1.4 table is statistical reasoning that ensures the sample size you inspect provides a reasonable representation of your order’s overall quality. And one positive aspect of AQL is that you don’t have to understand technical details and complex formulas to be able to use it for sampling and inspection.
But fully understanding the parts of the ANSI Z1.4 table will help you prevent mistakes when using AQL for inspection. Using AQL properly also reduces your chances of unwittingly shipping goods that don’t meet your quality standards (related: How Importers Use the AQL Table for Product Inspection).
If you want to find out your required sample size and acceptance and rejection point quickly, you can always use our AQL calculator.
Do you have questions about using the ANSI Z1.4 table for inspection? Let us know in the comments section below!
