 Imagine a customer has just bought an LED light from your store. They’re happy with the design and functions as stated on the product packaging. And they just can’t wait to install it in their home.
But upon installing the light, the customer suffers a severe electric shock. And a lawsuit swiftly follows, endangering your brand’s reputation and future success.
This example might sound extreme, but it almost happened to GE Lighting. GE recalled 46,000 LED tube lights in 2018 after discovering the product posed electric shock and electrocution hazards. Luckily, they were able to recall the product before it led to any injuries or lawsuits.
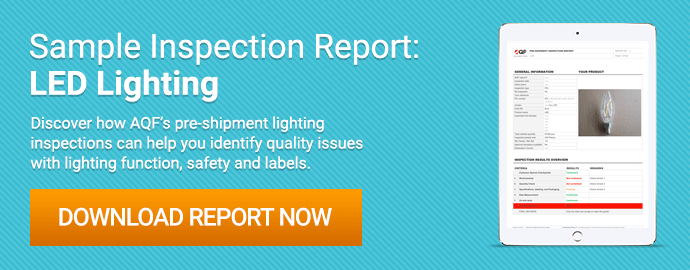
A pre-shipment lighting inspection with rigorous on-site lighting testing can help you avoid safety issues, as well as functional and performance issues with your products. Lighting testing can also help you ensure compliance with LED lighting safety standards and international regulations (related: Sample Inspection Report – LED Lighting).
Here are 11 tests to consider including in your LED lighting inspection checklist to ensure optimal product safety and performance.
1. Rub test on lighting rating label
A rating label is a printed mark on electronic products that typically includes such information as model numbers, voltage information, safety warnings and regulatory compliance symbols.
Check your target market’s labeling requirements before inspection, as there are different lighting labeling requirements for the EU, U.S. and Australia. Each market has its own requirements for the size, adhesion and content of the label (related: Import Lights into the EU? How to Ensure Lighting Label Compliance).
QC professionals generally suggest an on-site “rub test” of  rating labels to ensure markings are sufficiently applied to the product. The rating label should be clearly printed and permanently adhered to the product without any fading of the words or symbols.
The inspector should rub the rating label on the item by hand two times:
- First using a piece of white cloth soaked in water for 15 seconds
- Second using a piece of white cloth soaked in rubbing alcohol for 15 seconds
The rating label should not peel off, and all markings must remain legible for the product to pass this test.
2. Fatigue test for LED lighting
Switches or buttons on an LED lighting product will be used thousands of times over the average product’s lifespan. And a faulty switch will most likely cause your customer to request a refund. Or worse, they may just quietly discard your product and buy from one of your competitors thereafter.
A fatigue test can help you assess the durability of functional parts for prolonged use. During the fatigue test, the inspector will test any adjustable or functional parts of the product. For LED lights, this might involve pushing buttons or switches several times.
First the inspector will use the part as intended at least 20 times in a row and sometimes up to 50 times depending on time restrictions. Then they’ll check for any malfunction of the adjustable parts.
Inspection professionals typically suggest performing this check on an AQL S-1 sample size (related: The Importer’s Guide to Managing Product Quality with AQL [eBook]). Testing a larger sample size could extend the time needed for inspection.
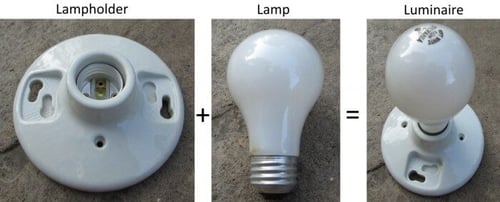
3. Assembly check for LED products
Not all products come ready to use. LED light bulbs are almost always packaged separately from a lamp holder or mounting bracket, for instance.
 An on-site assembly check can help you verify whether customers can easily assemble, install and use your product.
The inspector will assemble the product according to the assembly instructions, with ordinary tools or tools supplied with the product at purchase. The goal of this test is to mimic the actual process your customer will experience when assembling and installing your product.
The recommended sample size for this test is at least two units, depending on the assembly steps required. You might consider conducting this test on a larger sample size if assembly doesn’t require more than one or two small steps.
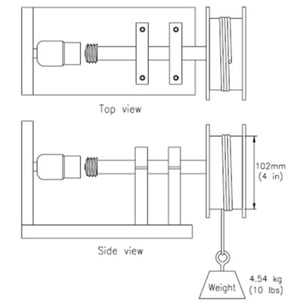
4. Torque test for lighting components
Torque testing is common for products with rotating parts, such as screws, fasteners or bolts. For light bulbs, the light bulb screw base often needs to be screwed into a lamp holder, for instance.
 The torque test measures the rotational force required to turn, open or close these parts and helps you identify any potential quality issues with them. For example, a part could stretch and weaken if the torque is too high. Or a part could easily loosen if the torque is too low.
This test requires a piece of specialized equipment known as a torque tester. Your supplier would generally need to provide the torque tester for the inspector to use. This piece of equipment is too large for most inspectors to carry to the inspection site themselves.
Torque is measured in a unit known as “newton metre”, commonly abbreviated as “N·m”. There are different standards for how much torque to apply to the lamp holder depending on the lamp holder type and intended market.
Some common standards include:
 The above European classifications apply to mounting brackets for Edison screw or bayonet-capped lamp holders.
The torque should be applied in the correct direction to loosen locked screws and similar connectors—normally counterclockwise. The inspector should test an S-1 sample size or larger and confirm that:
- The lamp holder remains in place. There should be no item movement for one minute.
- There is no permanent deformation of the housing.
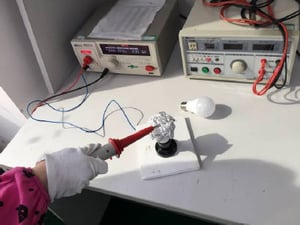
5. Hi-pot test for compliance with LED lighting safety standards
The hi-pot test, or high-potential test, is one of the most important safety tests for electrical products. It’s so important that most importers perform a hi-pot test on the entire sample size drawn for inspection.
Also known as a dielectric voltage-withstand test, the hi-pot test measures the electrical current that flows through the insulation of a product. A hi-pot test can help you measure current leakage and detect electrical, or dielectric, breakdown.
The tester will stress the product’s insulation at higher voltage levels than those it would typically handle during normal use. The product should be safe to use at normal voltage levels if it’s able to withstand a relatively high voltage for a short period of time.
There are two main LED lighting safety standards for hi-pot testing, including UL 1598 and EN 60598:

Like the torque tester, your supplier will typically need to provide a hi-pot tester/dielectric strength tester on-site for the inspector’s use. The voltage should be applied between:
- The primary wiring and accessible non-current-carrying metal parts that
 can become energized; and
 - The primary wiring and accessible uninsulated live parts in the secondary circuit of an isolating transformer rated for a maximum open circuit voltage of 30 V RMS or 42.4 V peak
The inspector should then check for any current leakage or dielectric breakdowns.
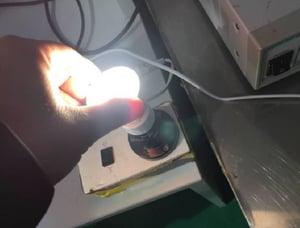
6. Function test for lighting
Aside from safety issues, function issues with a lighting product can also have a major impact on your lighting business’ success.
A function test helps you verify whether your LED lighting product functions properly according to the user manual. This is another one of the most necessary lighting tests that warrants applying to the entire inspection sample size.
This test typically doesn’t require any specific equipment. The inspector will check all the product’s intended functions, such as:
- Turning the light on and off
- Checking proper illumination
- Confirming the light dims properly, if relevant
The inspector should report any functional issues observed, as well as any deviances from your instruction manual and specifications.
7. Endurance testing
During the function test, the inspector tests each individual function of the product over a short period of time. But a lighting product can be used all day long and must withstand continued use. Lighting importers are responsible for ensuring their products won’t overheat or explode suddenly during normal use throughout the product’s lifespan.
An endurance test, or running test, assesses the safety and functional performance of your lighting products over time. The inspector should leave the light continuously running at the highest setting for four hours. The inspector carefully observes the performance of the product periodically during this time to check for any malfunction.
Afterwards, the hi-pot test and full function test should be repeated on the tested units to ensure the product is still safe and functional. The recommended sample size for this test is S-1.
8. Internal check against a component data form
Some product quality issues aren’t noticeably visible by just checking the exterior appearance of the product.
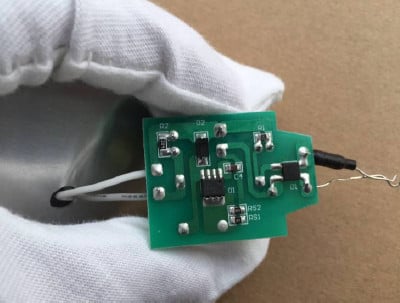 Checking internal components and construction is especially important for electrical products like lighting. A supplier might otherwise use unapproved, inferior components in your product to lower their production costs (related: Why “Quality Fade is Killing Your Products and What to Do About It).
You or your supplier should provide the inspector with a certified component data form (CDF) for the inspection. A CDF is a table of critical components and your approved manufacturers of those components. The inspector can compare the components in your actual product against the CDF and report any nonconformities.
The inspector disassembles the product and checks the marks of conformity listed in the CDF against the actual marks found on the product’s components.
Below are some of the main points the inspector should pay attention to during an internal check for lighting products:
- Confirm external screws are not stripped before disassembling the sample
- Check for any stripping of internal screws
- Check for any metallic residue inside
- Check for any cracked, chipped or broken screw columns, ribs or rims
- Check the workmanship of the soldering joint. There should be no cold solder joints or other poor soldering present
- Check the firmness of the internal wire connection
- Check whether the internal wire is burnt or scrapped, or whether the conductor is exposed
The recommended sample size for this test is at least two units. This test should also be conducted after the function and hi-pot tests to ensure the product is safe to disassemble.
9. Item drop test
The item drop test is typically only conducted for portable electric luminaires, like small handheld lamps, flashlights and desktop lamps. This test ensures your customer’s safety even if your product falls onto the floor.
An item drop test is required for shelf-mounted luminaires under the UL 153 standard. It’s also mandatory for luminaires intended for use in hazardous conditions under the UL 844 standard.
The inspector drops a shelf-mounted unit from a height of 3 feet (91.4 cm) onto a tissue paper-covered, nominal 1/2 inch (12.7 mm) thick, knot-free softwood sheet supported by a concrete floor.
The inspector should confirm during and after the test that there is no:
- Flame or molten metal emission
- Product or test surface combustion
- Exposure of parts presenting a risk of electric shock
The inspector should also then perform a hi-pot test on the tested unit to verify there is no dielectric breakdown following the drop test.
10. Lighting source/integrating sphere test
LED lighting importers typically market lights as meeting 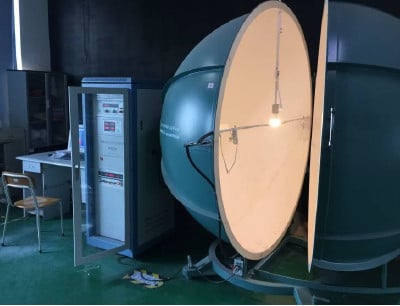 certain brightness, color or efficiency standards. But how can you confirm production units actually meet these standards?
An integrating sphere test can measure the lighting source using common metrics.
This test requires an integrating sphere system with a spectroradiometer for spectral mismatch corrections and computing software. Most lighting manufacturers should have both the equipment and related software available on site already, as they’re essential for LED lighting manufacturing.
The inspector places the LED light inside the integrating sphere and then observes the results via the computer software. The recommended sample size for this test is at least three units.
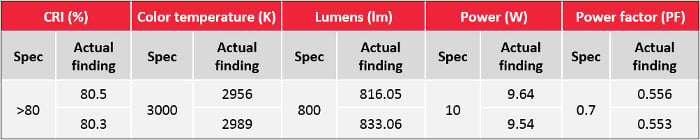
The inspector then records these metrics on the report compared to your spec:
- Color rendering index (CRI): A quantitative measure of the ability of a light source to reveal the colors of various objects faithfully in comparison with a natural light source, rated from 0 to 100. A higher CRI indicates a more accurate color rendering.
- Color temperature: Measured in degrees of Kelvin (K) on a scale from 1,000 to 10,000. A “warm” color temperature is typically 3,000K or less, while a "cool" color temperature is 4,000K or more.
- Lumens (lighting output): A measure of the total amount of visible light emitted from a light source. The higher the lumen rating the brighter the lamp appears to the human eye.
- Power consumption: The rate at which energy is generated or consumed, measured in Watts. LED bulbs typically range from 4 to 18 Watts—up to 90 percent lower than incandescent bulbs.
- Power factor: The ratio of real power (Watts) used by the load compared to apparent power (Voltage x Current drawn) into the circuit: Power factor = Watts / (Volts x Amps). Energy Star requires LED lamps of 5 Watts or greater to have a minimum power factor of 0.7.
 11. Electromagnetic compatibility (EMC) test
Electromagnetic compatibility (EMC) lighting testing helps ensure your LED light doesn't emit excessive electromagnetic interference during use. High electromagnetic interference can disrupt or damage other electronics.
Your lighting product’s radiated and conducted emissions shouldn’t affect other products within the same environment, 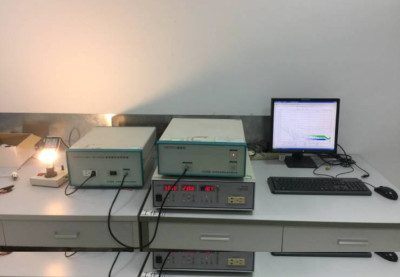 nor should it be affected by their emissions.
Lighting products in the EU are governed under EMC Directive 2014/30/EU. The EN55015 and CISPR 15 LED lighting safety standards provide specific EMC requirements for lighting products. FCC Part 15 and FCC Part 18 set EMC standards for U.S. lighting products. The EMC measurement requirements between these standards are largely similar.
The recommended sample size for this test is five to eight units. This test should be conducted in an isolated room, or ideally, a specialized EMC lighting testing chamber.
The inspector should test for:
Conclusion
Every LED lighting inspection should include comprehensive and thorough lighting testing. Lighting testing helps you ensure compliance with LED lighting safety standards and your own performance standards (related: How a Convenient Online Platform Simplified Lighting QC for Seynave [case study]).
Be sure to specify all inspection requirements in a quality control checklist for both your suppliers and QC team. A detailed LED lighting inspection checklist should always outline testing procedures, sample sizes, necessary equipment and who should provide that equipment. Otherwise, incorrectly performed tests can affect inspection results and give you an inaccurate assessment of lighting quality.
When performed correctly, lighting testing is one of the best safeguards against lighting safety and performance quality issues.
Download our lighting inspection sample report below to learn how lighting testing can help you manage product quality.