 Imagine you’re a customer at a clothing store where you’re a regular shopper. You buy a size medium jacket, expecting it to fit like a similar medium-sized jacket you’ve bought there before. But you get home and the jacket doesn’t fit as you expect. You’ll likely return the jacket, right? You may even hesitate to shop there again in the future.
Now imagine you’re the importer of this jacket and facing numerous product returns. You realize you didn’t set clear enough tolerances for dimensions of the jacket in your inspection criteria, resulting in jackets that don’t match your sizing requirements. Now you’re left with a substandard shipment of goods and an ongoing quality crisis because of one missing detail during garment inspection.
Third-party inspection has become a key part of many garments importers’ supply chains (related: How Betabrand Limits Quality Defects to Delight Their Garment Buyers [Case Study]). With an inspection team on the ground, you can see exactly how your products look without needing to personally visit the factory to check. But you need to clearly specify your requirements and steps for inspection to get a truly accurate report of your order’s quality. Let’s look at the five steps to garment inspection you should always ensure your QC staff follow.
1. Measure garment dimensions
The most important function of any piece of clothing is that it fits the end consumer as intended. Every garment importer can attest that customers will often return a garment if it doesn’t fit as expected. Ill-fitting garments don’t just create extra costs for you in the form of unsellable products. They can also create long-term problems as once-loyal consumers disavow your brand and turn to a competitor with better quality control.
Unlike mass manufacturing for other products, which often uses precise machinery and automation, the work of manufacturing garments is still largely done by hand. This results in a greater margin for error in each piece of clothing. Discrepancies in dimensions are inevitable when manufacturing garments. That’s why any thorough garment inspection should include detailed measuring of dimensions.
Specifying tolerances for garment dimensions
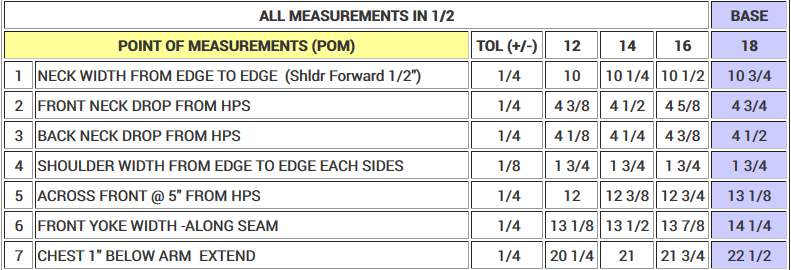
There can be a major difference in consequences of a pant leg that’s 1/8 inch too long versus one that’s 1/2 inch too long. This is why you should always provide your supplier and QC staff with tolerances for dimensions to affirm the margin of error you’ll accept in your garments. QC inspectors will use these tolerances in reporting on-site to determine whether an item passes or fails inspection (related: Garment Inspection Guideline [eBook]).
The tolerance for any given dimension can also be adjusted for each point of measure based on how crucial they are to the overall fit to the garment. For example, you might set a smaller tolerance for the waistband of a skirt and a slightly larger tolerance for the side skirt length. Discuss with your supplier before beginning production so that you can agree on a reasonable tolerance for your products.
2. Check function of closures, buttons, zippers and other accessories
Most garments aren’t simply a few pieces of fabric stitched together. Rather, they also include functional and stylistic accessories like buttons, snaps, zippers, ribbons and elastic bands. A broken closure on a garment usually renders the clothing item unwearable and, therefore, unsellable. Most consumers find poor quality closures to be a nuisance and frustration to repair. Poor quality or attachment of these accessories can lead to negative customer reviews and can even cause bodily harm to consumers.
Garment inspection should include on-site function checks of closures to test durability and ensure they’re securely attached to the garment. Common tests include:
- Pull test: Pull at the accessory with a pull gauge for 10 seconds to confirm it stays securely attached to the garment.
- Fatigue test: Use the accessory as intended for 50 cycles (e.g. button and unbutton 50 times) in quick succession and confirm it’s still functional and the garment is undamaged after testing.
- Stretch test: Stretch elastic bands and straps for proper elasticity and check for any breakage in elastic fibers or stitching.
QC professionals generally conduct pull tests and fatigue tests on two pieces of each style of garment. It’s normally unnecessary to carry out these tests on every piece in the sample during inspection because the processes used in attaching accessories to garments tend to be consistent throughout a shipment. But the quality of elastic materials used in production of some garments can vary between pieces. So inspectors usually perform a stretch test on the full sample size when relevant.
3. Verify proper packaging and labeling of garments
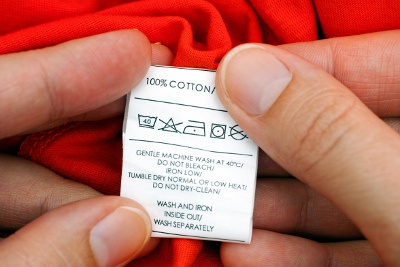
Verifying proper packaging and labeling of garments is an essential part of most final inspections.  Proper packaging ensures your garments arrive at their final destination in the same condition they left your supplier’s facility. Aside from inspecting packaging, your QC team should also check the labeling of garments to ensure compliance to legal requirements.
Conformance to legal requirements for garment labeling
The United States government requires all garments sold in the country to have labels that include the following information:
- Fiber content of clothing compliant with the Textile Fiber Products Identification Act
- Country of origin: where the item was manufactured or where the most significant manufacturing process occurred
- Manufacturer identity: either the company name or the Registered Identification Number (RN) of the manufacturer, importer or another firm marketing, distributing or otherwise handling the product
- Care instructions compliant with the Care Labeling Rule
In addition, items that are produced using wool, leather or fur must follow other labeling requirements. Garment importers who fail to meet any of the above requirements can face fines, delays or refusal of goods at customs.
Packaging inspection for garments
Most garments are sealed in polybags by factory staff before being packaged in retailer and shipping cartons for transit. Incorrectly packaging and sealing your garments can lead to dust and moisture permeating and soiling your products. And failing to comply with legal requirements for suffocation warnings on polybags could lead to fines.
Inspecting packaging for potential quality issues in transit and distribution includes verifying:
- Polybag sealing method
- Polybag size
- Appropriate labeling, barcodes and price tags
- Retail artwork and printing
- Carton assortment
When ordering a number of different sizes of garments be sure to consider how to sort these garments among shipping cartons. For example, how many women’s dresses of each size—small, medium, large and extra-large—should each carton contain? Imagine the frustration of receiving 20 extra-small dresses and only three extra-large dresses when you intended to receive the same proportion of every size. You can prevent this problem by including assortment in the specifications you provide your supplier and inspection team.
4. Test fabric for conformance to quality standards
For some products, such as promotional goods, the quality of input materials might not drastically impact salability. But fabric quality is a major determinant of the quality and salability of the finished product when manufacturing garments. Product testing of your garments, both on-site and in a qualified laboratory, provides assurance that your product meets your quality standards (related: 5 On-Site Product Tests for Garment Inspection).
Fabric GSM check
Grams per square meter (GSM) is a measurement of fabric density applied to garments and raw textiles. Almost anyone can perform a GSM check with little training and equipment needed.  During inspection, QC staff use a GSM cutter to cut a circular piece of fabric from a sample and then weigh it using an electric balance. They then compare the measured GSM to the customer’s specifications.
Garments typically have a somewhat low GSM if they are intended to be light and comfortable for the wearer. Other times, the GSM found during testing can be significantly lower than agreed upon. And this would be a “red flag” showing that your supplier might have used a lower quality fabric than you specified. The consequence to consumers could be that the garment doesn’t stand up to regular wearing and washing.
Stitches per inch (SPI) check
A check for stitches per inch (SPI) involves the QC inspector simply counting the number of stitches in one inch of a selected area of the garment. An SPI check is easy to conduct, as it only requires a tape measure and adequate lighting. Checking SPI on two pieces of each style in a shipment is normally adequate.
While a SPI check is relatively nontechnical and easy to perform, that doesn’t make it any less important than other testing. Stitch density is an important determinant of a garment’s quality and durability. Garments with a higher SPI are less likely to fall apart with regular use and tend to last longer than those with a lower SPI.
Material composition check
Some obvious differences in fabric composition can be detected by hand feel alone during a garment inspection. But most garment importers require material composition testing by a qualified lab that’s outfitted with proper equipment and controls. Material composition should reflect the breakdown of fiber types listed on the product label. Fabric composition that doesn’t match what’s printed on the labeling can cause financial and legal trouble that can irreversibly damage your brand.
5. Report on quality defects and severity
Visual inspection for quality defects is a critical step to any professional QC inspection for garments (related: How Experienced Importers Limit Quality Defects in 3 Stages [eBook]). Like those found in other types of products, different quality defects found in garments often differ in severity. Some defects may be easily overlooked by customers, while others are likely to result in product returns.  That’s why QC professionals typically classify defects into one of three categories: minor, major and critical (related: How to Classify Defects for Garment Inspection).
Some common defects garment importers might face include:
- An untrimmed thread
- Shading variance between different pieces of the same style or different parts of the same piece
- A loose needle left in the garment
Most garment importers would agree that a loose needle left in a garment is a more severe issue than an untrimmed thread because of the hazard it poses to the consumer. But the severity of other defects might vary based on your intended market and sale price. Setting defect classifications before quality control inspection for garments will help ensure that QC staff consider all defects in accordance to your specific quality standards.
Defect classification zones in garments
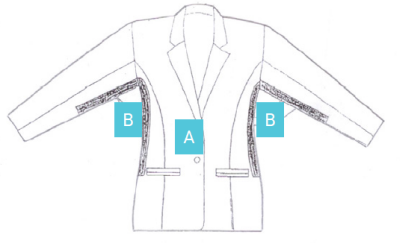
Garment importers also typically classify defects depending on the location of the defect on the garment through zoning. Most garments can be divided into two zones. Zone 1 (or zone A) refers to an area of the garment where the visual appearance is considered especially important. A defect in zone 2 (or zone B) would be less noticeable to consumers upon first glance, and therefore is less important. For instance, customers are more likely to return a jacket that has a stain on the front than one that has a similar stain located on the underarm of the sleeve.
How do you know how many defects of each type are acceptable in your order? As the customer, it’s your prerogative to establish the quality standard for your products. But using a statistical sampling system like AQL can help you determine the number of defects acceptable in a representative sample based on your standard.
Conclusion
Inspections are commonplace among most product categories. But they’re especially important when manufacturing garments, as manual production processes often result in products that are more prone to human errors and mistakes. These steps to garment inspection convey the essential basics of quality control inspection for garments. You may find your quality requirements dictate the need for additional steps, such as other product testing.
Regardless of your particular requirements, it’s vital that you, your supplier and your inspection team have a clear understanding of what’s expected. All relevant parties need ready access to current specifications, inspection criteria and any other quality documents. Be sure to continually update your product specifications after inspection to reflect any unforeseen quality issues found during inspection and other changes.
What other essential steps would you include in the inspection process for garments? Share in the comments section below!


